What are WebPixels?
WebPixels are JavaScript code snippets inserted into your website’s code to help you collect behavioral data on the customer events such as clicking with a link, adding a product to the cart, etc. this data is used for optimizing marketing campaigns and analytics.
How do the Shopify WebPixels Work?
Once you have created the Shopify webpixel and configured it on your merchant’s store, the pixel is loaded on the online store. As visitor browses your online store, they may either click on a link or move a product to the cart. This will trigger the customer events that are published to a Shopify data layer or event bus. Your pixels subscribe to the events on this data layer and transform them into the format that complies with the requirements of your pixel data endpoint.
How to integrate Shopify WebPixel?
The Shopify webpixel manager helps you manage the pixels for effectively tracking your customer events. Previously, the merchants should manually add the JavaScript snippets into their online store, check out snippets, or in apps. The scripts added aren’t quality-controlled and consume time to manage. But Shopify’s Pixel Manager
simplifies the process by storing the scripts in a single management tool and running them in a sandbox environment.
Sandbox Environment for Shopify WebPixels
Shopify has a secure sandbox for the app pixels and custom pixels. A sandbox is an isolated environment to help you run scripts without affecting the rest of your online store. The sandboxed pixel can run anywhere on your website, but it is restricted to accessing the data available within the sandbox. It ensures that any pixels installed or created in the pixel manager cannot access the data outside the stated intent of the pixel.
You need to create and configure the webpixel app extension for each of your Shopify stores and collect customer events.
1. Creating the app
Open the command line in your project directory and run the following commands to create a new app.
npm init @shopify/app@latest
A prompt then appears on the screen asking for an app name. Enter the name of your choice for your app. Once you input the name, another prompt appears to choose a template for the project. Choose the node option. The output of the command is a new app project created locally on your personal computer.
2. Create the webpixel app extension
You need to acquire two permissions to work with the webpixel app extensions. The first one is to write the web pixel merchant settings through write_pixels. The second permission is to get access to customer events through read_customer_events. Here is how you get the permissions required:
- To add the two permissions, enter the below code to shopify.app.toml:
# This file stores configurations for your Shopify app.
scopes = "write_pixels,read_customer_events"
- Add the Shopify webpixel to your project by running the command below and create a new app extension:
npm run shopify app generate extension
A prompt appears on the screen asking for the type of extension you want, select web pixel and follow the instructions as mentioned to generate your webpixel app extension.
Once the process is complete, a new folder is created in your app directory titled extensions. The folder has all the code related to our web pixel app extension.
3. Define your webpixel settings definition
If you want the webpixels to properly track and associate customer events, each of your Shopify stores is to be configured by the web pixels. Find out the settings definition for your web pixel at extensions/<your_extension_name>/shopify.ui.extension.toml
Inside the command prompt, shopify.ui.extension.toml, you can define fields that can be used by web pixels. Go through the following example to view the shopify.ui.extension.toml file with a description.
type = "web_pixel_extension"
name = "pixel"
runtime_context = "strict"

[settings]
type = "object"

# [settings.fields.name]
# name = "name"
# description = "description"
# type = "single_line_text_field"
# validations = [{...}]

# [settings.fields.name]
# name = "name"
# description = "description"
# type = "single_line_text_field"
# validations = [{...}]
The file shopify.ui.extension.toml is stored by default under the file name accountID.
type = "web_pixel_extension"
name = "pixel"
runtime_context = "strict"

[settings]
type = "object"

[settings.fields.accountId]
name = "Account ID"
description = "Account ID"
type = "single_line_text_field"
validations =  [
  { name = "min", value = "1" }
]
Each of the fields defined has a definite name, description, and type. But the only file type supported for webpixel is single_line_text_field. You can provide validations as an optional parameter and can be used to define constraints on the field’s value. The next step is to set up subscriptions to the events that are emitted.
4. Subscribe to customer events using Shopify webpixel API
This event subscription will let your application listen to the events emitted by Shopify and other developers. You can subscribe to a specific event or all events using the analytics.subscribe.
Add an event subscription to your application using the extensions/<your_extension_name>/src/index.js.
Once you run the generate command to create the extension, a set of basic sample codes is created in the file. You can insert this code to enable a subscription to the target events. For example, inserting the following code that subscribes to all events.
import {register} from '@shopify/web-pixels-extension';

register(async ({analytics, browser, settings}) => {
  // get/set your tracking cookies
  const uid = await browser.cookie.get('your_visitor_cookie');
  const pixelEndpoint = `https://example.com/pixel?id=${settings.accountId}&uid=${uid}`;

  // subscribe to events
  analytics.subscribe('all_events', (event) => {
    // transform the event payload to fit your schema (optional)

    // push customer event to your server for processing
    browser.sendBeacon(pixelEndpoint, event);
  });
});
By adding this code, the web pixel is set to listen to all the customer events that are emitted.
5. Publish your extension

- Create and deploy your application to the Partner Dashboard.
- After the app is deployed, add the webpixel app extension to it through the Partner Dashboard.
- Choose Apps from your Partner Dashboard.
- Click on the title of your app.
- Select Extensions and click on the name of your webpixel app extension.
- Click on the Create version and choose your desired Shopify webpixel version.
- In the Version History, select Publish to publish the current web pixel version.
Once you create and publish your extension, add it to the development store.
6. Create a webpixel merchant setting for a shop
Activate the web pixel app extension by running the mutation webPixelCreate using GraphQL. When this mutation is called for, Shopify validates against the settings definition that you have defined in shopify.ui.extension.toml. If the call does not match the schema you have defined, the mutation will fail ultimately.
“The mutation below creates a web pixel, setting the accountId declared in shopify.ui.extensions.toml to the value 234.”
Run the GraphQL code shown below on the merchant store.
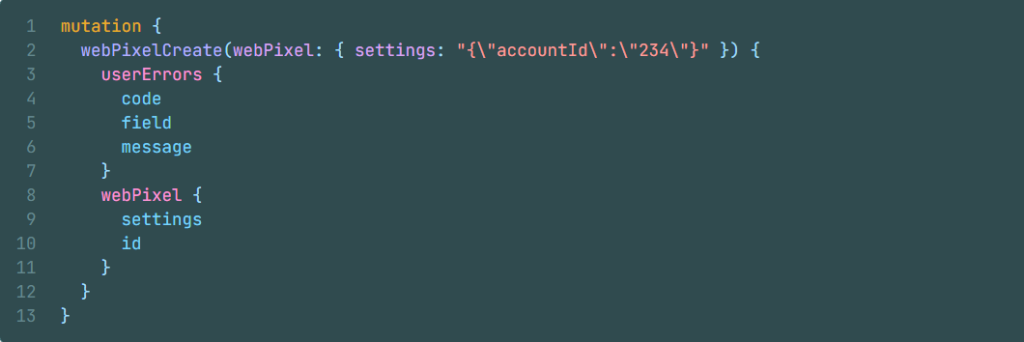
The web pixel is configured and subscribed to all the events emitted on the merchant store.